Breaking Down the Baseband
Shannon in a nutshell
Over the past 30 years, technology has revolutionized communications. Mobile phones, now owned by about 80% of people worldwide, have become our constant companions and the most widely adopted innovation after television.
These devices rely on complex network standards implemented through specialized processors. Like all software, this underlying code may contain undiscovered bugs waiting to be found.
Let me introduce the Cellular Processor, or CP for the connoisseur.
In this blogpost we will cover various topics from exploring a modem firmware, trying to understand how it works, how we can reverse it, emulate it, fuzz it and discover crashes. I will also go through problems and bugs I had because success comes from failures, and that is an aspect of the research I find important.
In this article, I will speak about the Samsung Galaxy S10. I’ll mainly call it by its product number and not commercial name, G973.
With this being said, let’s first see what is Shannon.
Shannon ≠ Karen
Shannon is the name given by the researcher community for the firmware used by Samsung in their phones. Technically, it’s the name of the operating system running on the SoC. By what we could see, they mainly use the Shannon Firmware in the Galaxy version (high-end smartphones) instead of the A** version (cheaper ones).
This was not mentionned or this is not an info I found, but I think Shannon was chosen because this is the name used by the kernel to mention the modem.
But why is the modem an interesting target ?
Let’s think about how to hack a phone.
From the perspective of an attacker, the mobile phone is the ideal target:
- We have it everyday
- We use it to pay
- We store sensitive information about us
- We talk with our friend of private things
- We use it to consult mails, news and basically everything we are interested in
Obviously, we started to see a lot of hacks and scams running on mobile phones, to steal people their identity, their personal information, their money and everything that has a value in the black market.
The most popular attack vectors are:
- Malicious App (tricking the user to download a Trojan app or a stealer app)
- Phishing Links (tricking the user to click a malicious link and steal its info)
- Zero days exploitation (less common)
All those vectors run on the AP. But what is the AP ?
Today, and since about 2010, mobile phones have many processors working together, with 2 main ones:
- The AP, Application Processor, used to run main apps, rendering, computing, encoding, decoding and all usual task in a computer.
- The CP, less known but not less used, let me introduce the Cellular Processor (also known as modem or baseband)
As opposed to the AP (running a know kernel, with decompilable binaries and packages, known and documented stacks), the CP is more closed source. However, with the loader, we will be able to read the code, and emulate it.
For a better understanding on where the baseband is implied, let’s take a schema.
Here is the 4G architecture, also known as LTE (Long Term Evolution):
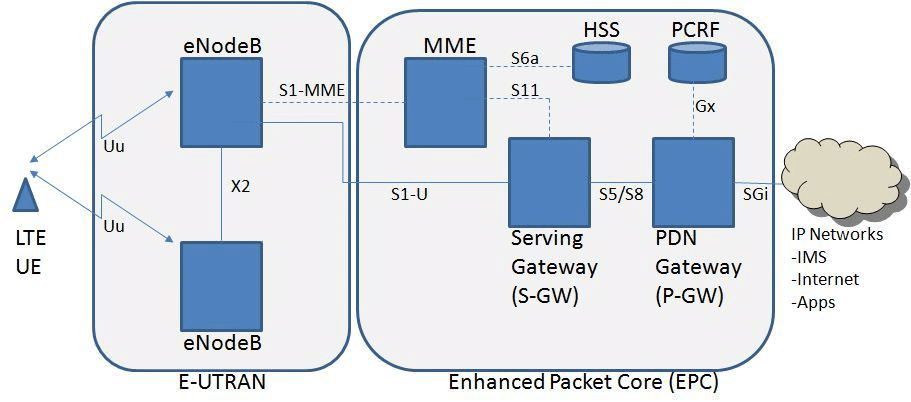
Keywords:
- UE: user end, basically the phone
- eNodeB: evolved Node B, the successor of the Basestation in UMTS
- E-UTRAN: Evolved Universal Terrestrian Radio Access Network
And as we talk about the user plan (UE and E-UTRAN), i’ll not go into the EPC.
In our phones, the baseband will be in charge of registering to, communicating and interacting with the eNodeB by using all the 3GPP defined protocols for encapsulating and de-encapsulating all sent and receive messages
Obviously, we also encoutered data specifications and protocols used to encapsulate sent datas lite RRC, IMS or SIP. As the whole RTOS has been written by samsung devs (no use of external libs), they also coded the MMU, allowing firmwire, our emulator, to map the right sections at the right places. There is also complete regions filled with 0 as RAM. Of course all those task will have to allocate and free memory, which is very good for us as fuzzing can lead to pretty cool memory corruption bugs.
The Architecture
For this article, we will focus on the exynos SoC. Those chips are made by samsung. But note that they also use MTK SoC worldwide and qualcomm SoC for US phones.
For the exynos version, the firmware analysed was compiled in ARM, but we also encountered nanoMips on the MTK SoC.
Thankfully, a lot of very good researchers made awesome works on the shannon firmware, allowing us to work with a solid knowledge. I’ll leave the sources and some resources in the Sources Section.
The AP and the CP communicate with a mailbox system and hardware bus:
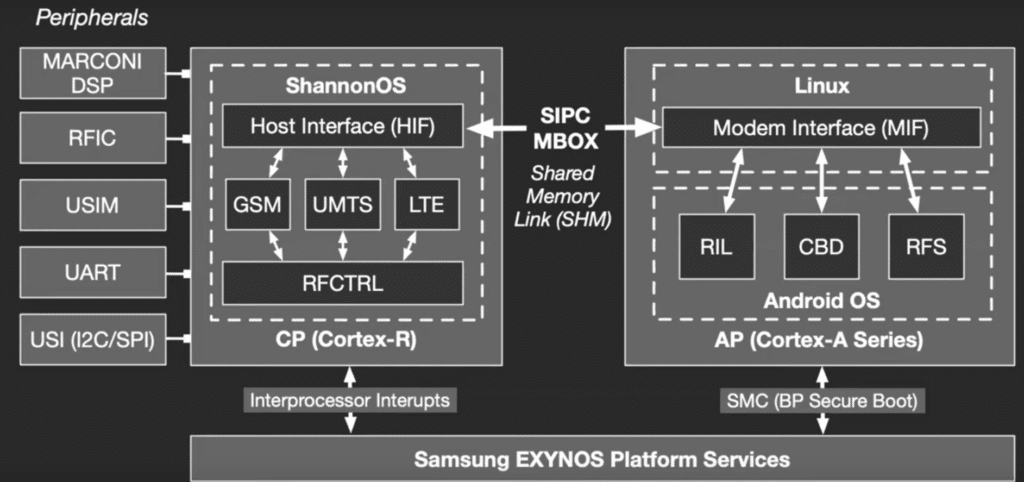
They both have access to a shared memory where both AP and CP can send each other related info. At the moment info is written in the mailbox, the writer raise an irq to advise the other party that some infos need to be retrieved.
Furthermore, we also decided to reverse some APK’s we could find one the platform and found a lot of references to Serial and UART.
UART means Universal Asynchronous Receiver Transmitter, it’s a way of sending datas using serial protocol and typically used in hardware or IoT, as instance, in a router to get a shell. Here, it’s quite different. On the SIPC mailbox, they added another layer for UART. This line is used to transmit commands by sending raw bytes to an opened stream.
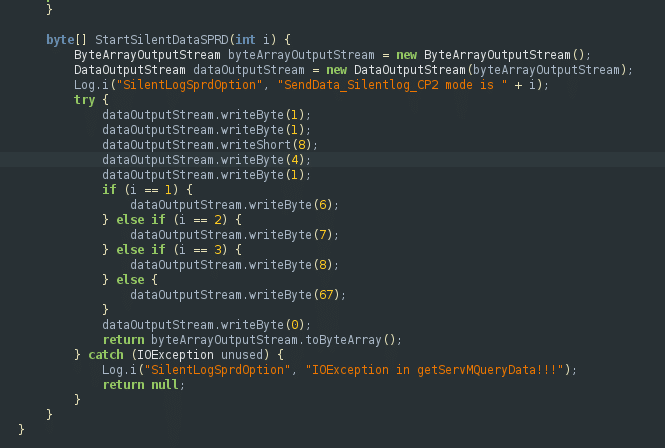
Here is the code of an extracted APK we found on the G973. This piece of code is part of the Service Mode APK, openable by using USSD code *#9900#.
This sequence of sended bytes must represent a command for the modem but as we are only starting our research on the AP side, this is only an hypothesis. Since now, we were not able to find where this lands in the baseband code.
But do not discourage, as this is a physical line, we can, theorically, do mitm, intercept commands and even send some !
As this is part of the reversing process, I will not go deeper in it, but when you start working with baseband, taking a look at the applications on the AP communicating with it is definitely a good way to understand what’s going on inside of your platform.
Our journey inside Shannon is only starting. In the next part we will start looking at how we can reverse the firmware and start looking at the code running on our beloved samsung phones.
The Firmware
Overview
When I think about firmware, the first thing that came in my mind was IoT. I used to work on router, extracting firmware from good old eeprom, find a good old linux and try messing with it. But here, it’s a totally different kind of firmware.
First of all, it’s not a basic linux filesytem compress in a lzma or jffs2 filesystem. It’s a full proprietary (but not unknown) format to compress a complete RTOS.
By the way, the Shannon firmware is pretty big, about 60MB of codes and strings.
The first thing I try when i’m in front of an uknown format is to use binwalk. But the behavior of binwalk with this image is pretty erratic:
Here is a sample of a binwalk run on a Shannon firmware. Binwalk detected a bunch of files but all of these are false positives triggered by binwalk detecting some magic bytes where it’s just ASM or strings.
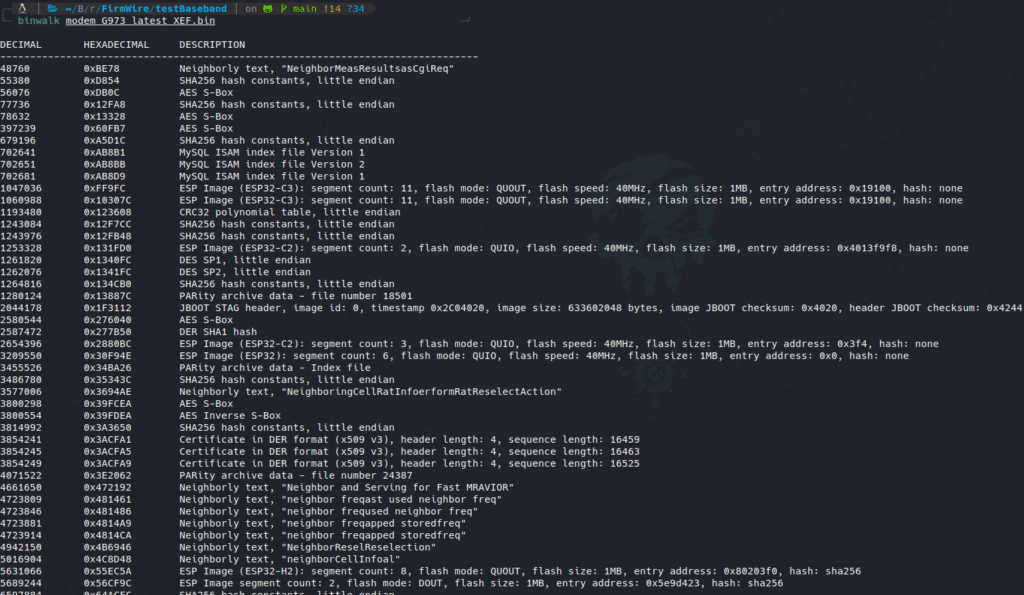
So binwalk is a dead end.
To identify if what you are analyzing is a Shannon, you need to look at the first bytes of the file. The format for the Exynos brand of SoC used by samsung in their phones is not that hard to read and pretty easy to understand.
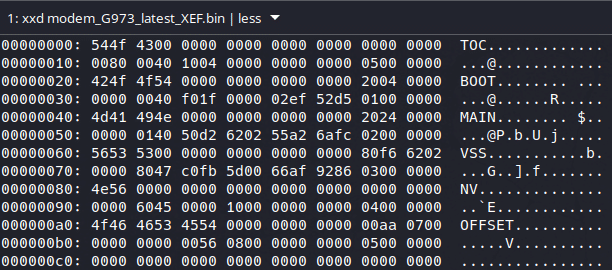
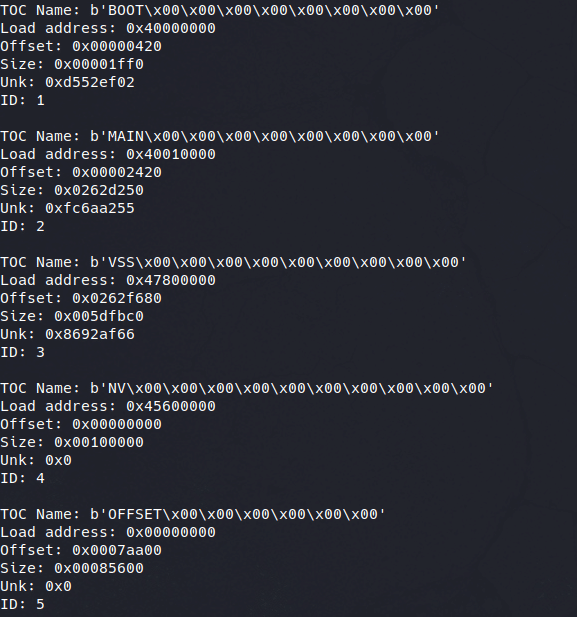
First of all, we have a Table Of Content (TOC) starting at byte 0 of the firmware:
There is a very good breakdown of the structure in Grant and Marius’s presentation but to make it short. Inside of those 192 bytes lays a structure of 32 bytes long:
| Field Name | size (in bytes) |
|---|---|
| section name | 12 |
| Offset in file | 4 |
| load addr | 4 |
| size | 4 |
| CRC | 4 |
| Entry Index | 4 |
For instance, let’s take the main section:
| Field Name | Value (Main section) |
|---|---|
| section name | Main |
| Offset in file | 0x2420 |
| load addr | 0x40010000 |
| size | 0x0262d250 |
| CRC | 0xfc6aa255 |
| Entry Index | 0x2 |
Keep in mind that those values are in Little Endian.
We can also use a script to automatically extract TOC table. This script can be found on this repo.
If you try looking deeper into the firmware, first of all, you will find a lot of strings. About 150k of debug messages used in various task. But obviously, you will also find code, and this can be easily see with the entropy of the file:
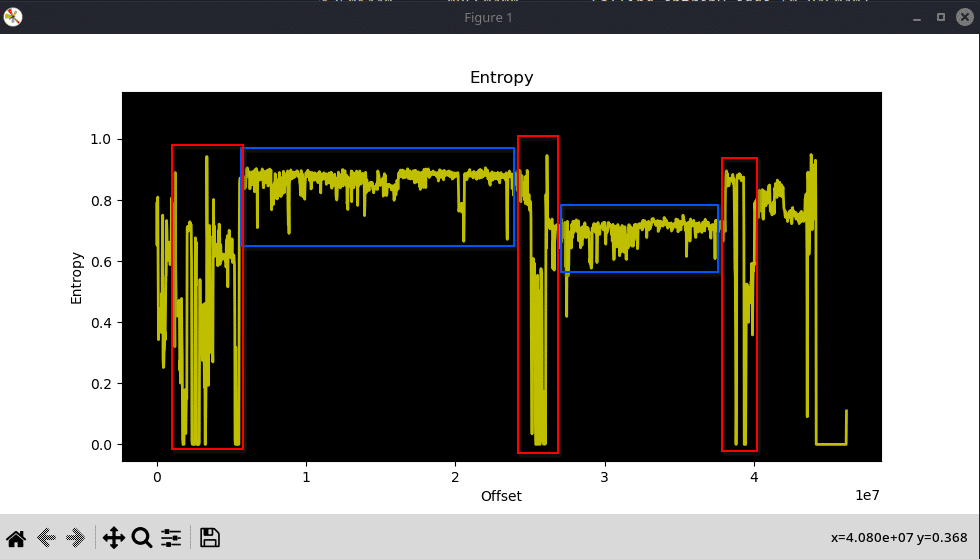
With the help of the entropy, we can know which section seems to contains code or strings. The red rectangles represent the section filled with mainly 0 or strings while blue rectangles seem to contain code. But how do we read this code ? That’s where we start our reverse engineering !!
Just (t)ask and you shall receive
The implementation of all needed protocols strictly follows the 3GPP.guru documentation. As they can’t be implemented in one big monolithic function, each phase of the protocol has it’s own method. For instance, let’s take the MM. Also known as Mobility Management, this protocol allows the UE to keep connection to the cellular network when moving, moving fast or traveling around the globe.
If you want to look at this implementation, simply search MM_<action>
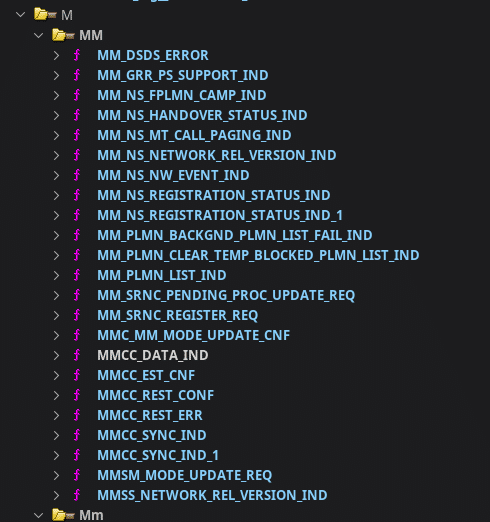
Those functions, all linked together, are called a Task. Basically, when the UE needs to use the MM, it will look for the address of the task entry point in a table findable in the firmware, the SYM_TASK_LIST.
A task can be summary by a big While true loop where it will send, receive or compute what needs to be in order to complete the task.
nonnahS reverse
As this is a proprietary format, the first thing a reverser will try to do is just loading it into ghidra or you preferred SRE.
To be able to work properly, memory is important, and as this firmware is quite huge, we will extract the main section just to see what could be the result when loading it to Binary Ninja.
As we parsed the TOC, we know the offset and the size of the Main section and we can run dd:
size = 0x0262d250 = 40030800
offset = 0x2420 = 9248
dd if=modem.bin of=main_section_modem.bin skip=9248 count=40030800 bs=1
You can also extract all sections with the script used for parsing the TOC table by running:
python3 parse_mode.py --unpack-all
With this done, let’s load our file in binaryNinja.
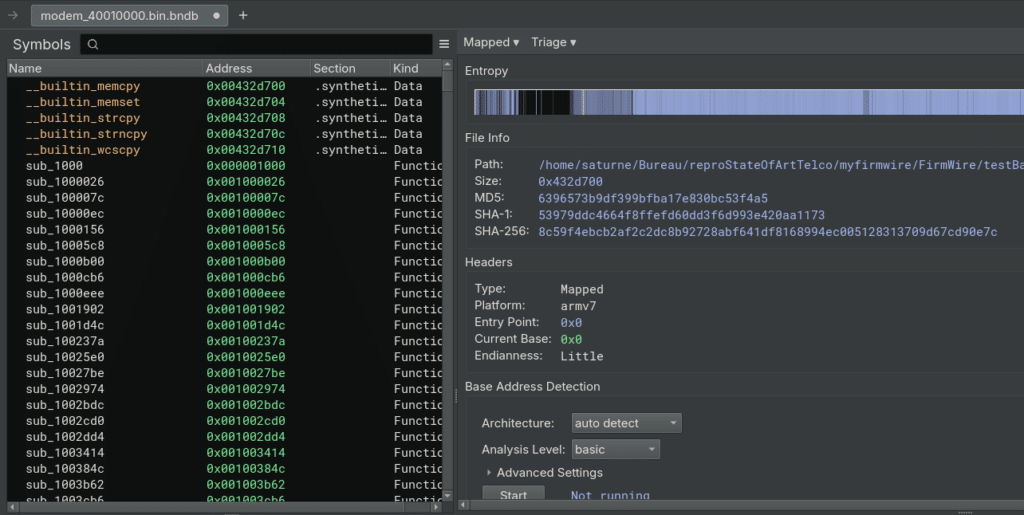
Thanks to the API, I can ask how much functions I have, about 67600, and on top of that, I have no names on the functions, branches are broken, no symbols, and most of all, there is no auto switch between arm and thumb. Let me explain this:
Our firmware was compiled for the ARM architecture. As you know, in ARM, we can encounter different types of instructions, such as ARM and Thumb modes. Where ARM instructions are all 4 bytes long, the Thumb mode allows the compiler to have compressed instructions on 2 bytes. Most of the time, and by what I could encounter, the bootloader phase will be executing ARM mode (stack init, heap init, peripherals init…), then, a branch will be made by putting the LSB of the jump to 1. For instance, your PC = 0x40010000 and you want to jump to a Thumb function laying at address 0x40011532. To enable Thumb mode, jump at address 0x40011532+1.
As these switches are not made or computed by binaryninja, it would be very time consuming to repair the binary view. Instead, we can use the marvelous loader written by one of the author of firmwire, Grant H. Thanks to his work, we have a ready to use ghidra loader for the shannon format. More than just allowing us to explore a better-formatted code, the ShannonLoader will also parse the TraceEntries (debug string available in some functions and used to give them a name), resolve the MPUTable (Memory Protection Unit table, used by the firmware when mapping sections in memory), resolve the ScatterLoad function and ScatterLoadEntries (Function in charge of compressing, decompressing, setting to zero, and copy sections in memory) and a lot of other stuff very useful when trying to find bugs.
Load the Loader
To be able to use the loader, some steps must be followed. First of all, clone the loader with git.
There is a precompiled archive for the loader but was made for the version 9.2.2 of ghidra, so you need to compile it for your version. All the following commands was tested for Ghidra 11.1.2.
Before doing anything, we need some dependencies. As the loader was written in java, we need to install both the jdk and the jre, recommend using the openjdk21. They can be installed by running:
sudo apt install openjdk-21-jdk openjdk-21-jre
then go into the ShannonLoader folder and run:
GHIDRA_INSTALL_DIR= JAVA_HOME= ./gradlew
This should compile the loader and put the result inside the dists folder.
Launch Ghidra and click on File → Install Extensions . Select the archive you just compiled.
Restart Ghidra, create a project or open an existing one. Import your modem.bin file by pressing I or drag and drop the file in the ghidra main window. Open the default CodeBrowser or your own derived tool. Open the script manager and add the script folder (under the path ShannonBaseband/reversing/ghidra/scripts) to your scripts paths.
This done, a new category should have been created called Shannon. In this category you should find 3 scripts: ShannonPrintFixup.py, ShannonRename.py and ShannonTraceEntry.py. Those 3 script must be run in a particular order to ensure a proper resolution of symbols and references.
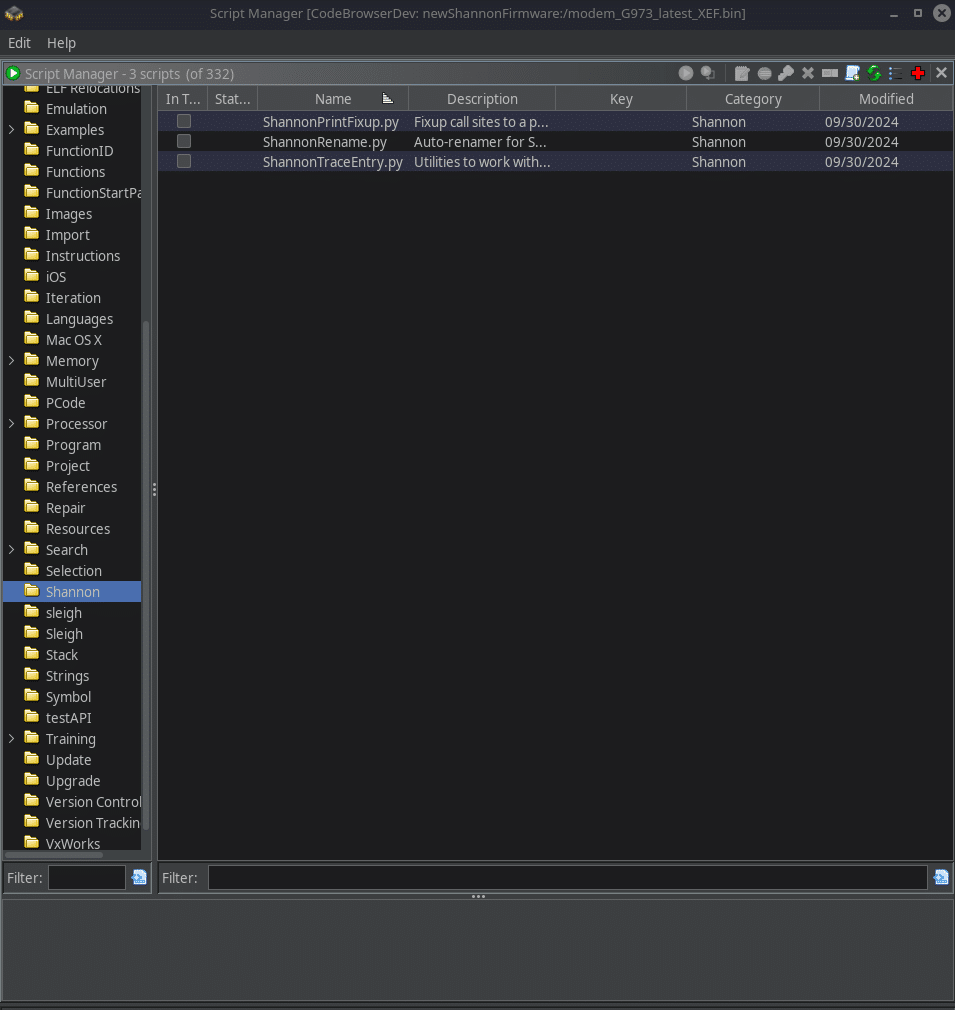
So, right after opening the code browser, refuse the auto-analysis and go to your scripts. Run the ShannonTraceEntry.py. It should resolves all the traceEntries in the firmware. This can take some time so go make a coffee. Once this script is done, run the auto-analysis, disable the Non-Returning Functions - Discovered options and click Analyze .
This again will take some time so go make another coffee.
Once this done, you should have a lot of functions starting by FUN_<addr> . If you ever used ghidra, you know that this is the default name for a newly created function, but don’t worry (be happy), we have a script to rename them.
After running the auto analysis, go back to the script manager and run the ShannonRename.py script. This one will rename your functions based on the TraceEntries they use.
And as you love coffee, go take a 3rd one.
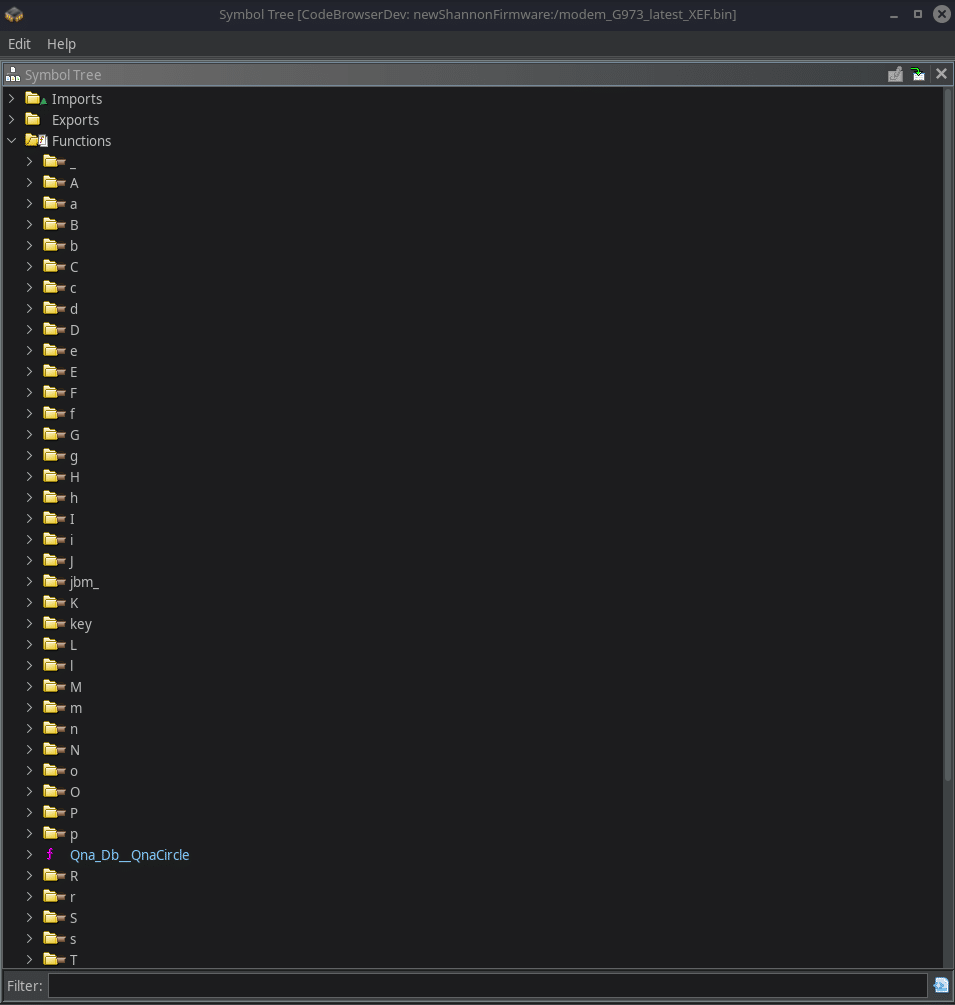
After running it, your symbol tree should have been updated.
During my research, I remember of two majors functions classes (and by class I mean the component the function will interact with, ie: pal for pal_MsgSendTO) are:
- PAL for Platform Abstraction Layer
- HAL for Hardware Abstraction Layer, and every derivation for HAL
Those two classes will allow some very cool features for our emulator. I can only recommend you to take a look at what they offer as it will increase your understanding of the firmware and its whole behavior.
Now that we can reverse it, why shouldn’t we emulate it ? That’s great for us, Marius Muench and Grant Hernandez developed firmwire.
Stop emulating GBA, emulate Shannon instead
Firmwire is a wonderful emulator allowing us to create the peripherals, memory map and symbols needed by ShannonOs to run. Furthermore, it adds another abstraction layer to allow us to fuzz !
By combining python (for creating the avatar machine and setting all parameters) and libpanda (to run the virtual machine) they created a pretty flexible emulator allowing reseacher to emulate both Shannon and MTK firmwares. As we will focus on the G973 we will not discuss about the firmware that could run on the Mediatek SoC in this blog (but stay updated).
We all know python for its flexibility, but remember, python is not the only component firmwire is made of. So, before starting, we need to setup a complete environment for firmwire. To allow simple emulation, firmwire devs provided a ready-to-use dockerfile to deploy a complete environment. But as we want to fuzz, a docker is not the best option.
As a good fuzzer, I’ll assume that you have an available machine to install a new os. In our case, this will be ubuntu 20.04. I’ll also assume that you know how to install Ubuntu and let’s talk about the setup. First of all, clone the firmwire repo:
git clone https://github.com/FirmWire/FirmWire && cd Firmwire
To know which dependency you need to install, there is a little trick. Go inside the Dockerfile and simply copy the commands run by Dockerd when setting up the Firmwire Docker. Here is the result:
 Warning: Make sure to open a root session as no commands have sudo
apt-get update && apt-get upgrade -y && \
apt-get -y install --no-install-suggests --no-install-recommends \
automake \
bison flex \
build-essential \
chrpath \
git zip zsh openssh-client \
clang clang-tools \
python3 python3-dev python3-setuptools \
libglib2.0-dev gcc-arm-none-eabi \
libtool libtool-bin \
wget curl vim \
apt-utils apt-transport-https ca-certificates gnupg dialog \
libpixman-1-dev \
virtualenv python3-ipython \
python3 python3-pip libc++-dev libcurl4-openssl-dev libelf-dev libffi-dev libdwarf-dev libelf-dev libwiretap-dev wireshark-dev python3-pycparser \
protobuf-compiler protobuf-c-compiler python3-protobuf libprotoc-dev libprotobuf-dev libprotobuf-c-dev libjsoncpp-dev \
gdb-multiarch python3-pip qemu-utils libcapstone-dev \
&& apt-get update \
&& apt-get install -y gcc-9-mipsel-linux-gnu gcc-9-multilib \
&& update-alternatives --install /usr/bin/mipsel-linux-gnu-gcc mipsel-linux-gnu-gcc /usr/bin/mipsel-linux-gnu-gcc-9 10 \
&& pip3 install https://foss.heptapod.net/pypy/cffi/-/archive/branch/default/cffi-branch-default.tar.gz \
&& cd Firmwire
As all the line are escaped, you can just copy and paste this code box in your terminal
Now, let’s build the dependency panda. In my opinion, it was the most difficult step in creating a fuzzing-ready environment. Once again, just copy paste the code box in your root shell.
rm -rf panda \
&& git clone --depth=1 https://github.com/FirmWire/panda.git \
&& cd panda \
&& git checkout main \
&& rm -rf build \
&& mkdir build \
&& cd build \
&& ../configure --disable-werror --target-list=arm-softmmu,mipsel-softmmu \
  --cc=gcc-9 \
  --cxx=g++-9 \
  --disable-sdl \
  --disable-user \
  --disable-linux-user \
  --disable-pyperipheral3 \
  --disable-bsd-user \
  --disable-vte \
  --disable-curses \
  --disable-vnc \
  --disable-vnc-sasl \
  --disable-vnc-jpeg \
  --disable-vnc-png \
  --disable-cocoa \
  --disable-virtfs \
  --disable-xen \
  --disable-xen-pci-passthrough \
  --disable-brlapi \
  --disable-curl \
  --disable-bluez \
  --disable-kvm \
  --disable-hax \
  --disable-rdma \
  --disable-vde \
  --disable-netmap \
  --disable-linux-aio \
  --disable-cap-ng \
  --disable-attr \
  --disable-vhost-net \
  --disable-spice \
  --disable-rbd \
  --disable-gtk \
  --disable-gnutls \
  --disable-gcrypt \
  --disable-libiscsi \
  --disable-libnfs \
  --disable-smartcard \
  --disable-libusb \
  --disable-usb-redir \
  --disable-lzo \
  --disable-snappy \
  --disable-bzip2 \
  --disable-seccomp \
  --disable-coroutine-pool \
  --disable-glusterfs \
  --disable-tpm \
  --disable-libssh2 \
  --disable-numa \
  --disable-tcmalloc \
  --disable-jemalloc \
  --disable-replication \
  --disable-vhost-vsock \
  --disable-opengl \
  --disable-virglrenderer \
&& make -j `nproc` \
&& cd ../panda/python/core/ \
&& python3 setup.py install \
&& cd ../../../../ \
&& python3 firmwire.py \
; echo "Hello There Masterchief"
Wow, we can run Firmwire:
					              ___            __      _
-.     .-.   | __|(+) _ _ _ _\ \    / /(+) _ _ ___    .-.     .-
  \   /   \  | _|  | | '_| '  \ \/\/ /  | | '_/ -_)  /   \   /
   '-'     '-|_|   | |_| |_|_|_\_/\_/   | |_| \___|-'     '-'
             ~~~~~~~~~~~~~~~~~~~~~~~~~~~~~~~~~~~~~~   v1.1.0
                A  baseband  analysis  platform
                   https://github.com/FirmWire

usage: firmwire.py [-h] [-w WORKSPACE] [-S] [-s [GDB_SERVER]] [--snapshot-at SNAPSHOT_AT] [--console] [-t INJECTED_TASK] [--restore-snapshot RESTORE_SNAPSHOT] [--consecutive-ports CONSECUTIVE_PORTS]
                   [--fuzz FUZZ] [--fuzz-triage FUZZ_TRIAGE] [--fuzz-input FUZZ_INPUT] [--fuzz-persistent FUZZ_PERSISTENT] [--fuzz-crashlog-dir FUZZ_CRASHLOG_DIR] [--fuzz-crashlog-replay FUZZ_CRASHLOG_REPLAY]
                   [--mtk-loader-nv_data MTK-LOADER-NV_DATA] [--shannon-loader-nv_data SHANNON-LOADER-NV_DATA] [--debug] [--debug-peripheral DEBUG_PERIPHERAL [DEBUG_PERIPHERAL ...]] [--avatar-debug]
                   [--avatar-debug-memory] [--unassigned-access-log] [--raw-asm-logging] [--trace-bb-translation] [--full-coverage]
                   modem_file
firmwire.py: error: the following arguments are required: modem_file
Here we have a bunch of very useful options for our fuzzing campaign. But before diving into them, I’ll talk about some of the components of firmwire and some basic knowledge for a better comprehension.
Look at my patterns
Remember when I talked about the MPUTable ? The one used when the firmware boot so it can knows how to map each section in memory with the right permissions. This table is essential when trying to emulate a whole platform. Why ? Wonder what could happen if you mapped the BootLoader at the wrong place, higher than where it should be. As the whole firmware is PIE (works only with offset to branch) every branch would be broken, every access to other section of the firmware would result in a read to a non existing address.
Here is an example of some of the patterns defined in firmwire:
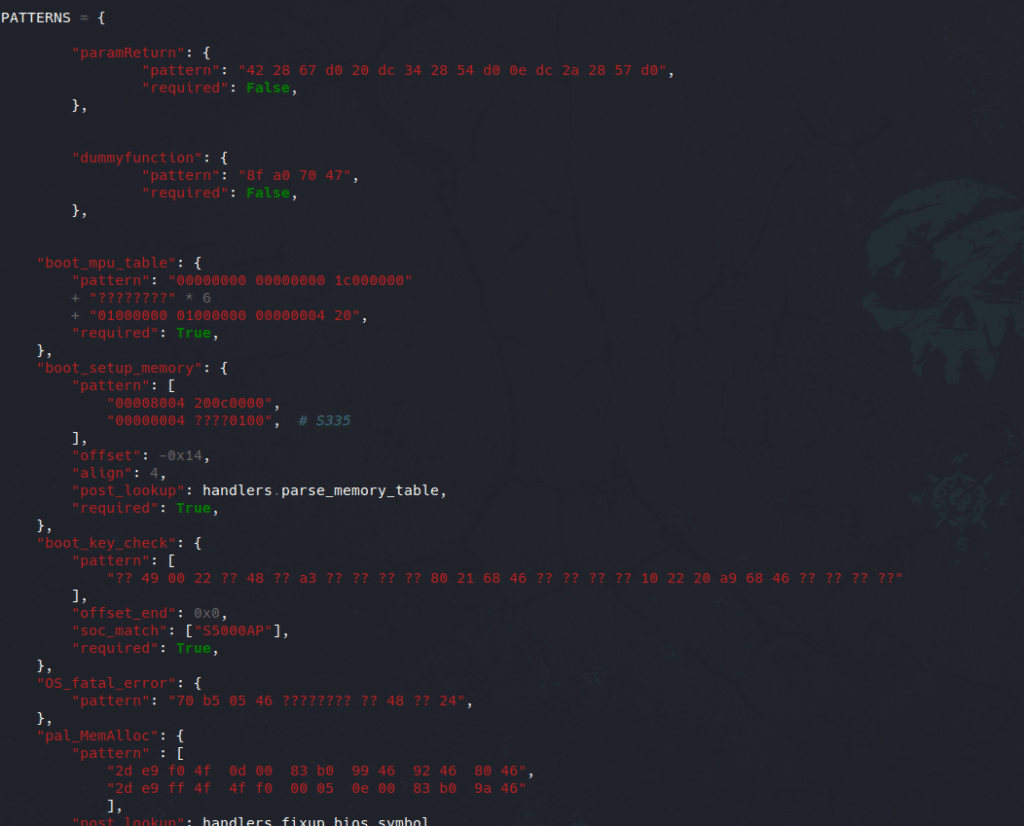
Obviously, tasks are not the only code waiting patiently to be run in the firmware, there is also debug function and most important, print functions (yeah; that’s cool to have an output when you try to understand whats going on). After spending a long time reversing the firmware to first, write a loader ; and second, understand the purpose of each functions, they could determine a pattern for every needed symbols for the emulation purpose. All those symbols can be found under the file firmwire/vendor/shannon/pattern.py , remember that we only talk about Shannon in our context, but there is also a pattern file for the MTK firmwares.
As you can see, patterns are just hexadecimal suite our python code will try to find in our firmware, so let’s try to add some !
First of all we need to find a function we want to import. By doing my reverse and by trying to understand what’s going on with ShannonOs, i found this very short function called dummyfunction . Basically, it just returns the string dummyfunction .
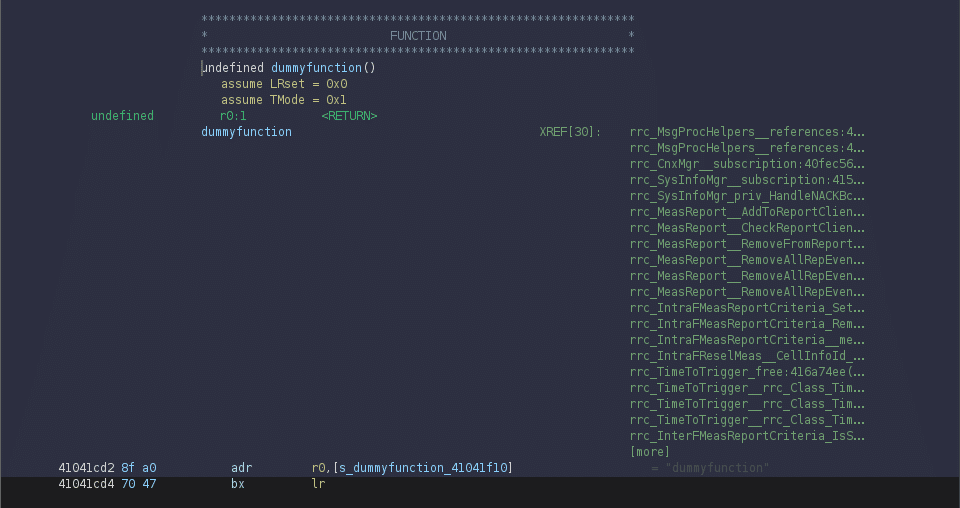
By what I could see, it is mainly used in the RRC protocols. After the value is gathered by the rrc function, it gather the actual address and then print in to get some sort of log of what is happenning in the RRC task.
So let’s create a pattern. By following the file, we need to create a new var:
"dummyfunction": {
        "pattern": "",
        "required": False,
    },
But what will be our pattern ? The whole dummyfunction code, simply. Giving us a beautiful dummyfunction pattern:
"dummyfunction": {
    "pattern": "8f a0 70 47",
    "required": False,
},
I recommend you to take a look at the awesome documentation made by the firmwire devs about the patterns, they give details on possible options for each pattern entry like a required options or how to configure a post resolution method. Keep this in mind as we will reuse it later with the modkit.
Modkit, like modding ?
As told earlier in this blogpost, firmwire devs (as explained in their paper) added what they called the Modkit. This modkit is basically a pretty complete toolchain, for us researcher, to write our own task and run them independently of the whole firmware. Independently because they will have their own taskId, their own stack, and most important their own thread.
Why is it important to have our own thread ? To be able to communicate with other running tasks.
Earlier I mentionned the pal, by what I could understand, ShannonOs creates a main task, this task will start all other tasks. For instance, CC and MM. If CC wants to talk to MM after you just landed to a foreigner country, it will create its message and send it to MM by using the pal_SmSetEvent(message, taskId).
The modkit sources can be found in the modkit/shannon folder at the root of the Firmwire folder.
Please take a moment to review the *.h and *.c files as they respectively contain the prototypes and codes for very useful functions. You can even write you own C codes, implements new types, new functions and everything you need to build the perfect environment.
Simple Task and fuzzing tasks
By diving in the modkit sources, you will likely notice the fuzzers folder. This folder contains the code of the pre-made and ready-to-go harnesses for various tasks, LTE_RRC, CC and MM
The main difference between a task and a fuzzing harness is the abstraction layer added by #include <alf.c> . By adding this and the option —fuzz-input you will be able to reproduce the bugs you found when fuzzing.
And now you should say “but we didn’t even started fuzzing”, I know, that’s where the fun things begin. Just note that the fuzzing task (the opposite of the simple task) is not the only tool to reproduce a bug, and remember that you add a layer to your emulator. Another tip I can give is once you have a bug/crash, write a task that reproduces it. By this, I mean hardcoding the input inside of you task and sending the message by yourself.
Remember to not forget removing the lines where your script gets its input from afl:
char * buf = getWork(&input_size);
and the line where it signals that the loop is finished:
doneWork(0);
I can only recommend you to start writing your own scripts and tasks to begin mastering the firmwire/ShannonOs API. Also go take a look again at the patterns as they offer ready-to-use symbols. But how to use those symbols ? Let’s dive deeper in the modkit.
So much symbols, too symbolic
As mentioned earlier, firmwire devs gave us keys in hands prototypes and code to start messing with Shannon.
First of all, the common.h file:
void * memset(void * dst, int s, unsigned int count);
void * memcpy (void *dst, const void *src, unsigned int n);
char * strcpy(char * dst, char *src);
int strcmp(const char * s1, const char * s2);
int strncmp(const char * s1, const char * s2, size_t n);
int strlen(const char * str);
contains very basic libc/strings.h functions but very useful for simple logic and memory management. Very useful when manipulating payloads.
The shannon.h file is one of the most important in my opinion. It contains the structures used for task queue management, task event management, and for creating well-formed messages for the fuzzed tasks.
MODKIT_FUNCTION_SYMBOL(void, pal_MsgSendTo, int qid, void * item, unsigned int itemType)
MODKIT_FUNCTION_SYMBOL(void *, pal_MemAlloc, int type, uint32_t size, const char * szFile, unsigned int line)
MODKIT_FUNCTION_SYMBOL(void, pal_Sleep, int time)
MODKIT_FUNCTION_SYMBOL(void, pal_SmSetEvent, struct pal_event_group ** event, uint32_t code)
MODKIT_FUNCTION_SYMBOL(void, pal_MemFree, void *ptr, const char * szFile, unsigned int line)
Because you are so smart, you recognized that those functions are the one matched earlier by firmwire pattern-matcher. Don’t forget that you can always import your own functions. Remember when we created the dummyFunction pattern ? Let’s give it some purposes. Our entry must follow this pattern:
MODKIT_FUNCTION_SYMBOL(retType, symName, args*)
By looking at our function in ghidra, we can easily deduce the entry needed:
MODKIT_FUNCTION_SYMBOL(char *, dummyFunction, void)
GG, you created your own symbol for the firmwire modkit. You can now include the shannon.h file in your task and use this function in your tasks, fuzzing harnesses.
So, you have the fundamentals, the environment, the knowledge for using firmwire advanced options, let’s run our emulator.
Firmwire and Shannon, best friends fuzzever
First of all, cd into your firmwire env, switch to you python venv if needed and try, at least, running firmwire to display the help.
python3 firmwire.py

              ___            __      _
-.     .-.   | __|(+) _ _ _ _\ \    / /(+) _ _ ___    .-.     .-
  \   /   \  | _|  | | '_| '  \ \/\/ /  | | '_/ -_)  /   \   /
   '-'     '-|_|   | |_| |_|_|_\_/\_/   | |_| \___|-'     '-'
             ~~~~~~~~~~~~~~~~~~~~~~~~~~~~~~~~~~~~~~   v1.1.0
                A  baseband  analysis  platform
                   https://github.com/FirmWire

usage: firmwire.py [-h] [-w WORKSPACE] [-S] [-s [GDB_SERVER]] [--snapshot-at SNAPSHOT_AT] [--console] [-t INJECTED_TASK] [--restore-snapshot RESTORE_SNAPSHOT] [--consecutive-ports CONSECUTIVE_PORTS]
                   [--fuzz FUZZ] [--fuzz-triage FUZZ_TRIAGE] [--fuzz-input FUZZ_INPUT] [--fuzz-persistent FUZZ_PERSISTENT] [--fuzz-crashlog-dir FUZZ_CRASHLOG_DIR] [--fuzz-crashlog-replay FUZZ_CRASHLOG_REPLAY]
                   [--mtk-loader-nv_data MTK-LOADER-NV_DATA] [--shannon-loader-nv_data SHANNON-LOADER-NV_DATA] [--debug] [--debug-peripheral DEBUG_PERIPHERAL [DEBUG_PERIPHERAL ...]] [--avatar-debug]
                   [--avatar-debug-memory] [--unassigned-access-log] [--raw-asm-logging] [--trace-bb-translation] [--full-coverage]
                   modem_file
firmwire.py: error: the following arguments are required: modem_file
By what I could see in the code, we can divide the options in two categories: the firmwire ones, and avatar/panda ones.
For the firmwire options, I higly recommend to use the -s options as it allows you to run a gdb server on your firmware and start single stepping each instruction. Perfect for debugging a crash. (a crash we don’t have yet, I know, so let’s start a fuzzing campaign).
If you want to debug a crash, take a look at --raw-asm-logging. This options will print every executed instructions, very useful when debugging
This can be done in very few steps:
- First of all you need to build the modkit, very basic, just run
makein the modkit folder - Choose the harness you want to run/the task you want to fuzz
- Prepare an input corpus for this task (it is better to take well formed packet as they are the ones that will trigger memory allocation and parsing methods, visit 3GPP.guru)
- And run !
python3 firmwire.py --fuzz-triage --fuzz-input modem.bin
⚠️ Please note that I use —fuzz-triage and not —fuzz , there is a bug when using the —fuzz options with the S5000AP SoC family, that G973F belongs to. If you encounter an hang just after the boot, try this tip. Here is the issue page about this bug
Here is how to run a single loop, but that’s not very fun in our case, as we want to fuzz. Let’s use AFL. This a pretty long command but i’ll break it down so you can understand each argument:
AFL_DEBUG=1 afl4-fuzz -D -i fuzz_input/ -o myfuzzout -M gsm_cc_fuzz_latest -U -- ./firmwire.py --restore-snapshot gsm_cc_snap --fuzz gsm_cc --fuzz-input @@ modem.bin
AFL_DEBUG=1: afl debug flag, will redirect to stdout what you could print in your harness.-D: Allows permutations and bit flips-i: input corpus folder-o: output folder-M: Custom name for your campaign-U: Qemu mode, allows AFL to fuzz shell script, you might need to rebuild AFL++
--fuzz option seems to work well with the AFL layer added.
And now FIRE ! You will immediately recognize AFL famous cli:
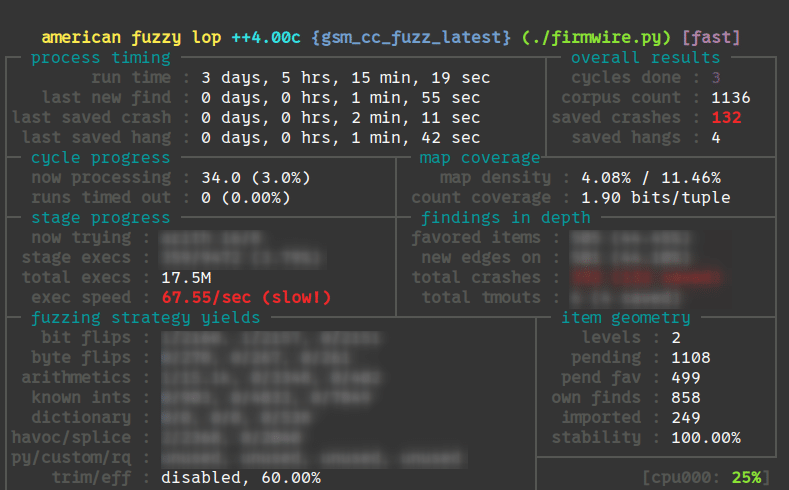
After about 3 days, we got crashes ! And most of them on the latest version of the g973f.
Conclusion
In this blog, we covered various aspects of the baseband vulnerability research, from how Shannon implements some features by looking at the disasm view to setting and running a proper fuzzing environment.
As you can see in the last screenshot, FuzzingLabs got crashes on Samsung Baseband, and that will be the topic of the next blogpost, our investigation on those crashes.
Sources
Julien
About Us
Founded in 2021 and headquartered in Paris, FuzzingLabs is a cybersecurity startup specializing in vulnerability research, fuzzing, and blockchain security. We combine cutting-edge research with hands-on expertise to secure some of the most critical components in the blockchain ecosystem.
Contact us for an audit or long term partnership!